The Diecast Toy Creation Process
Diecast toys, beloved by collectors and children alike, represent a fascinating intersection of artistry and manufacturing. These miniature marvels, known for their durability and intricate detail, undergo a complex production process that transforms raw materials into finely crafted replicas. Understanding how these toys are made offers a glimpse into the precision engineering and meticulous craftsmanship that bring these treasured objects to life. From initial design concepts to the final quality checks, each stage plays a vital role in creating the high-quality diecast toys enjoyed worldwide. This guide provides a comprehensive overview of the diecast toy creation process, detailing each step with clarity and insight.
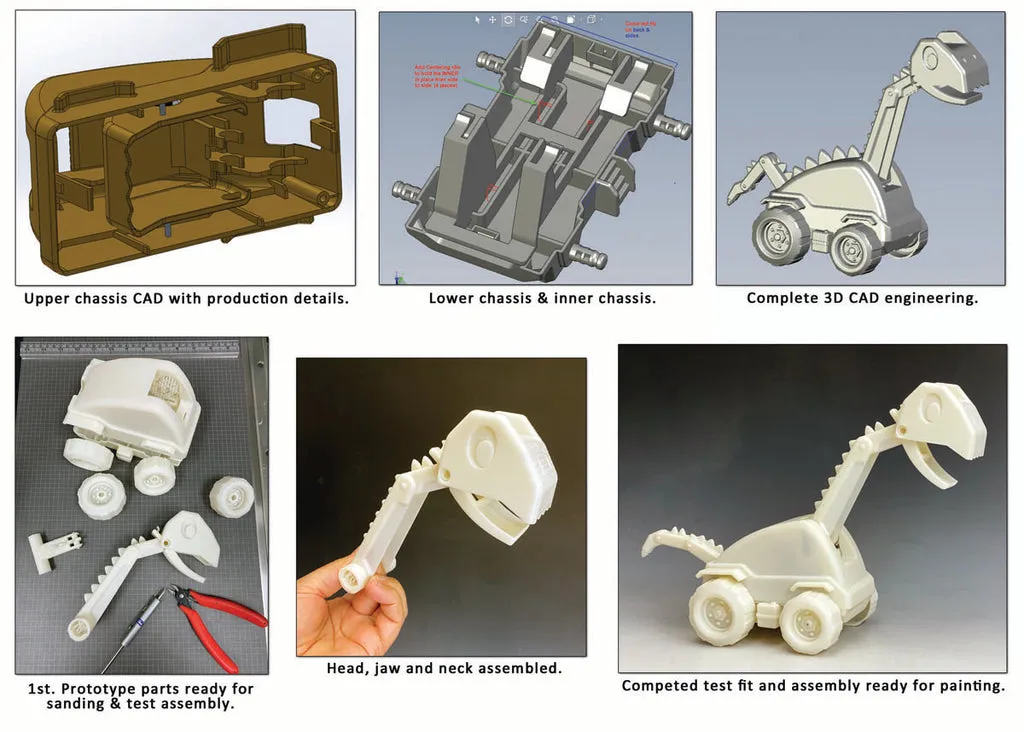
Design and Prototyping
The journey of a diecast toy begins with its design. This phase is where imagination takes shape, with designers and engineers collaborating to translate concepts into tangible forms. Detailed blueprints and 3D models are created, establishing the toy’s dimensions, features, and overall aesthetic appeal. This design phase also involves considering the toy’s functionality, such as movable parts or interactive elements, ensuring it meets both aesthetic and playability standards. This stage lays the groundwork for the entire production process, dictating the toy’s final appearance and features.
The initial design phase

Initially, designs are created, often involving sketches, CAD (Computer-Aided Design) models, and digital renderings. These designs meticulously define the toy’s appearance, dimensions, and features. Designers consider factors like scale accuracy, historical or fictional accuracy, and playability. The designs are refined through multiple iterations, incorporating feedback from various stakeholders, including engineers and marketing teams. This stage ensures that the final product meets aesthetic, functional, and marketability requirements. Accurate initial designs are crucial, as they serve as the blueprint for all subsequent stages, ensuring that the final product aligns with the original vision.
Prototyping process
Once the initial design is finalized, prototypes are created. Prototypes are physical models that allow for testing and refinement before mass production begins. These prototypes are often created using 3D printing or other rapid prototyping technologies. Prototyping allows designers and engineers to assess the toy’s functionality, identify potential manufacturing challenges, and make necessary adjustments to the design. Prototypes undergo rigorous testing, including stress tests and playability evaluations, to ensure the toy meets quality and safety standards. This iterative process helps to fine-tune the design, ensuring that the final product is both visually appealing and durable.
Material Selection for Diecast Toys
The selection of materials is a critical step in diecast toy manufacturing, directly impacting the toy’s durability, weight, and overall quality. The primary material used is typically a zinc alloy, prized for its excellent castability and ability to capture fine details. Other materials, like aluminum and steel, may be incorporated for specific components or to enhance certain properties. The choice of materials must balance cost-effectiveness with the desired performance characteristics, such as strength, resistance to corrosion, and the ability to withstand wear and tear. Careful material selection ensures that the final product meets the demanding standards of both collectors and young enthusiasts alike.
Zinc Alloy

Zinc alloy is the most common material used in diecast toy manufacturing, owing to its exceptional properties. It is a cost-effective choice that provides excellent castability, allowing for intricate designs and fine details to be captured during the die casting process. Zinc alloys have a relatively low melting point, which simplifies the manufacturing process and reduces energy consumption. Furthermore, zinc alloys offer good strength and durability, enabling toys to withstand regular handling and play. The versatility of zinc alloys makes them ideal for producing a wide range of diecast toys, from cars and trucks to airplanes and figures.
Aluminum
Aluminum is often used in diecast toys for components where weight reduction is a priority. Aluminum is considerably lighter than zinc alloy while still offering good strength and corrosion resistance. It is commonly employed in the production of aircraft and other toys that require a lighter build. Aluminum’s excellent thermal conductivity properties are also beneficial during the die casting process, enabling faster cooling times and higher production rates. While generally more expensive than zinc alloy, aluminum’s superior properties make it suitable for specific toy designs where performance and aesthetics are paramount.
Steel
Steel is often used for the internal components of diecast toys, where greater strength and durability are required. Steel is exceptionally strong and can withstand significant stress and wear, making it an ideal material for axles, screws, and other structural parts. The high melting point of steel requires specialized die casting techniques, but its strength and resilience ensure that toys can withstand extensive use. Steel components provide added robustness to the overall structure of diecast toys, contributing to their longevity and ability to withstand the rigors of play.
The Die Casting Process

The die casting process is at the heart of diecast toy manufacturing, involving the high-pressure injection of molten metal into reusable molds. This process ensures precision and allows for the creation of intricate designs and detailed features. The molds, meticulously crafted from steel, are designed to withstand extreme temperatures and pressures. Once the molten metal solidifies within the mold, the resulting part is ejected, ready for trimming, finishing, and assembly. This process is repeated thousands of times to produce the high volumes required for mass production. The die casting process is essential for creating the detailed and durable components that define diecast toys.
Preparing the Mold
The preparation of the mold is a critical step in the die casting process, directly impacting the quality and precision of the final product. Molds are typically made from high-grade steel, capable of withstanding the extreme temperatures and pressures involved in injecting molten metal. Before each casting cycle, the mold is carefully inspected for any imperfections or wear. It is then lubricated to facilitate the smooth flow of molten metal and ensure easy ejection of the finished part. The mold is also preheated to prevent thermal shock and promote uniform cooling of the cast metal. Careful mold preparation is essential for producing consistent, high-quality diecast toy components.
Injecting Molten Metal
The injection of molten metal is the core of the die casting process. Molten metal, typically a zinc alloy, is heated to a specific temperature and then injected into the prepared mold under high pressure. This pressure forces the metal into every crevice of the mold, ensuring that even the most intricate details are captured. The injection process is meticulously controlled to prevent air pockets and other defects. The precise timing and pressure of the injection are critical for achieving the desired quality and dimensional accuracy of the cast part. This stage is essential for producing the detailed features that make diecast toys so visually appealing.
Cooling and Solidification

After the molten metal is injected into the mold, it begins to cool and solidify. The cooling process is carefully controlled to ensure uniform solidification and prevent defects such as shrinkage porosity. The mold is often equipped with cooling channels that circulate water or other coolants to regulate the temperature. The time required for cooling varies depending on the size and complexity of the part, as well as the type of metal used. Once the metal has completely solidified, the mold is opened, and the cast part is ejected. This process is crucial for ensuring the structural integrity and dimensional accuracy of the final product.
Trimming and Finishing Diecast Parts
After ejection from the mold, diecast parts undergo trimming and finishing processes to remove excess material and enhance their appearance. This stage involves several steps, including the removal of any flash (excess material) and the application of surface treatments. The primary goal is to refine the cast parts, making them ready for painting, detailing, and assembly. These processes contribute significantly to the overall quality and aesthetics of the final diecast toy.
Trimming excess material
Trimming is a crucial step in finishing diecast parts, involving the removal of excess material known as flash. Flash is the thin layer of metal that forms at the parting lines of the mold during the die casting process. This excess material is typically removed using trimming dies, which are specialized tools designed to precisely cut away the flash. Other methods, such as grinding or machining, may also be employed to remove flash from complex or intricate parts. The trimming process ensures that all parts have clean edges and are free from imperfections, preparing them for subsequent finishing and assembly.
Surface Finishing Techniques

Surface finishing techniques are employed to improve the appearance, durability, and corrosion resistance of diecast toy components. These techniques include various methods such as polishing, sandblasting, and chemical treatments. Polishing is used to create a smooth, shiny surface, enhancing the visual appeal of the toy. Sandblasting can be used to roughen the surface, promoting better paint adhesion. Chemical treatments, such as passivation, can provide corrosion protection. These surface finishing processes contribute to the overall quality and longevity of diecast toys, enhancing their aesthetic appeal and functional properties. The choice of technique depends on the desired finish and the specific requirements of the toy.
Painting and Detailing Diecast Toys
Painting and detailing are the steps that bring diecast toys to life, transforming the metallic components into vibrant, realistic models. This process involves applying paint, often using automated spraying techniques, to create the base colors and finishes. Decals and detailed graphics are then applied to add intricate designs, logos, and markings. Careful attention to detail in painting and detailing is crucial for capturing the authenticity and visual appeal of the toy, making it highly desirable for collectors and enthusiasts.
Painting Process
The painting process is a crucial step in the creation of diecast toys, adding color and enhancing the visual appeal. The process typically begins with cleaning and preparing the surfaces to ensure proper paint adhesion. The paint is applied using various methods, including automated spray systems, which provide even coverage and consistent color application. Multiple layers of paint may be applied to achieve the desired finish, with each layer being allowed to dry or cure before the next is applied. Quality control checks are performed throughout the painting process to ensure that the paint is applied evenly, with no imperfections or defects. The painting process directly contributes to the overall appearance and marketability of the finished toy.
Decals and Detailing

Decals and detailing add the finishing touches that make diecast toys highly realistic and attractive. Decals, which are pre-printed designs, logos, and markings, are applied to the painted surfaces to add intricate details. These decals are carefully positioned and adhered to the toy, often using heat or water to ensure proper adhesion. Detailing, which can include hand-painting or the use of specialized tools, adds fine lines, accents, and other details that enhance the toy’s authenticity. Detailing is often performed by skilled artisans who meticulously apply each element, ensuring that the final product is visually appealing and true to its real-world counterpart. This stage is critical for capturing the realism and intricate designs that define diecast toys.
Assembly and Quality Control
The final stage of diecast toy production involves assembly and quality control. In this phase, the individual components are brought together to form the complete toy. Skilled technicians carefully assemble the parts, ensuring that they fit together correctly and function as intended. Rigorous quality assurance checks are conducted throughout the assembly process to identify any defects or issues. These checks include visual inspections, functional tests, and durability assessments. Only toys that meet strict quality standards are approved for packaging and distribution. Assembly and quality control are essential for ensuring that the final product is safe, reliable, and meets the high standards of both manufacturers and consumers.
Assembly Steps
Assembly steps vary depending on the complexity of the diecast toy, but generally involve attaching various components together. This can include attaching wheels, windows, interior parts, and other accessories. The assembly is often performed by skilled workers who use specialized tools and techniques to ensure that the parts fit together securely and function correctly. Screws, adhesives, and other fasteners are used to hold the components together. The assembly process requires precision and attention to detail to ensure the toy’s overall functionality and aesthetic appeal. Proper assembly is critical for creating a durable and reliable toy that can withstand regular use.
Quality Assurance Checks
Quality assurance checks are conducted throughout the manufacturing process to ensure that diecast toys meet strict quality standards. These checks involve visual inspections, functional tests, and durability assessments. Visual inspections are performed to identify any cosmetic defects, such as paint imperfections or misaligned parts. Functional tests are conducted to ensure that moving parts, such as wheels and doors, operate smoothly and correctly. Durability assessments involve testing the toy’s ability to withstand stress and wear, ensuring that it can withstand regular use. Any toy that fails to meet these standards is rejected, ensuring that only high-quality products reach the market. Rigorous quality assurance checks are essential for maintaining the reputation and customer satisfaction.